Friday, May 22, 2015

#AVeryCanuckSwap

Okay ladies! So I've been away for a while! Been super busy these past few weeks but am still doing my nails! Just no time to write out my life story's on them! Haha so finally I had time to get around to doing it and I have 4 nails arts to show you all plus this amazing swap I was just apart of! 

On IG some of you may remember in March a few of us Canadians did our first swap which was a total success ! And some of us even got together one day after it to meet each other! Your can read about that in an older post! 

It's been a while since doing all that so April Showers brang May Swappers! Hehe

We just finished this one & once again a total success! Only one girl waiting to get hers but tracking shows it'll be there Monday! Us Canadians just know how to do it / everything right ;) and we even had more girls this time around too! 

Oh girls, it was such a blast! 
Last time I was in the $25 category; this time around I decided to go with $50. Boy am I glad I did! But kind of went crazy cause I wanted to buy so many things! 


This is the Swap Box that I received from Trish -- @purplelicious_lavander on IG


Loved the card she wrote me! It was absolutely beautiful to get to know her!


All the beaaaautiful && yummy goodies she got me! Trish seriously spoiled me you guys! There were more chocolates .. but I ate most of them while I was opening everything up, I couldn't resist! 

First the Burts Bees I seriously needed! So that was my first go to and I put some on right away! && then the Julep Flower Bobby Pins caught my eye next, they are just too cuteee! If your wondering what the blue round things are up by the card well those babys.. Trish was soo kind enough to actually make me homemade mani & pedi bombs herself ! I couldn't believe it, it was soo sweet and they smell soo amazing! I am so thankful for everything that she got me!

Eek can't wait for the next one ladies!


This was the proof we had to show that our swap boxes were actually sent out, with covered postal codes & tracking numbers of course so the girls don't know who got them ;) 


Hope you all enjoyed !

Happy polishing 


Red & Gold Chevron Nail Art


Purrple Triangle Nail Art Design

Second post for the day! 

This is a triangle nail art design using another few new polishes from my swap box! Eeeks! I can't wait for the next one! 

I used Purrdy Polish ; purrple && 
Finger Paints ; Paint the Town Purple also Essie ; Blanc but that's a regular !
I also used some chevron vinyls to help crate the triangle and then striped on the lighter purple outlining the triangle with a striping brush!


Hope you enjoyed ! 

Happy Polishing !!

Sunday, May 17, 2015

Free Hand Zebra Print Nail Art

Haay loveelies 💕💕 
  
 Today I have quite a few nail art designs to show yaa! Work has had me super tired by the time I get home that I did my nails a few nights, took the picture either the other day or before doing another one, then kept on forgeting to post about them!! 😡 urgh ; now I have to write out like 4 posts that I do not have the energy to do but I have to before theirs more! 

So I've decided that the mani I have on right now ( which will be in the last post for today) will be on for a few more days or atleast till I finish blogging the others! Ugh I've promised you guys in my last few designs that I'll be posting more often, and I've just gotten worse! Haha 

Enough of my rambling && off to today's nail art design ; which btw, I abosloutley loved doing and thought was super cute!


I used two new polishes for this baby! One from a giveaway I recently won annd a polish from my #AVeryCanuckSwap Box!! 

Paint 2 coats of any beige of your choice to your middle & ring fingernails. I used ; 
Sonia Kashuk ; Nudist 
&& on your thumb, index, & pinky fingernails paint 2 coats of any colour you'd like ! I decided to use 
Nicole by OPI ; No Limits 
It may look black & it kinda is but it's got a blue tint to it in certain lighting!
Then you can start making the Zebra Print on your ring fingernails. 
On my middle nail I used a BornPrettyStore nail art rectangle gold stud for a bit more sass! 

Hope you all enjoyed !

Boy I hope I can get all my posts up by tonight! 

Happy Polishing !

Monday, May 11, 2015

🌸 Textured Flower Nail Art Design 🌸

             💕💕 Hay dolls  💕💕 

Today, I have a suuper duuper easy textured flower nail art design to show you! With studs! 

I don't know if you all noticed but.. that gorgeous pastel blue I used is another one of the many polishes, I won from one of my lovely & amazinng #MapleSistas Kait 🍁😘🍁 !! @Pawlished.Kait had a Instagram giveaway recently and I won! Catch this though .. 
Coincidentally enough .. I just found out I won another giveaway hosted by @BeyondTheNail -- && she sponsord Kait's Giveaway with that Spring Blue Cream I used below!! Coincidence or what!?!? I couldn't believe it! 

Anyways enough of my ranting!! && onto today nail art design!

Today's polishes are ;
O.P.I -- Pussy Galore 
Beyond The Nail -- Spring Blue Cream
HK Girl Fast Drying Top Coat 
& BornPrettyStore Silver Circle Studs 


Start by painting your ring nails two coats of your preferred textured polish, while drying; paint two coats of your next desired polish. Now take & place the BornPrettyStore Studs on your index & pinky nails only - for now. Hehe 

Once everything is dry take your textured polish and a dotting tool - and dot five dots in sort of a circle, creating the flower.
Make as many as you can fit or like onto your thumb and middle nails. Once you've done both hands the first one you did should be basically dry. I dotted a dot of topcoat into the middle of each flower and placed in the silver stud to create the centre. If you have extra space on your nails once your done these steps, using your dotting tool and textured polish make little dots & fill in the spaces.  

Now you got a super cool textured flower manicure ! Hope you all enjoyed !

Happy Polishing 😘😘

Thursday, May 7, 2015

Holo Nautical Stripe Nail Art

Hi loves! 
I'm back today with a very easy but super cool looking nail art for yaa!! 

Today's look was Inspired by @eyesonnails on Intagram!


To get this holo nautical goodness look. you will need any white polish of your choice. I used a new one I got from a recent giveaway prize that I won! -you can read about it in my previous post- It's e.l.f ; white && a holo polish of your choice -preferably blue to achieve the nautical look- I went with indie brand @lavishpolish - Blue Raspberries! It's it gorgeous !?!?!? Also! Some striping tape or straight vinyls. I used @lou_it_yourself vinyl guides, & gold circle studs! Mine are from BornPrettyStore.com !!

Start by painting two coats of the blue polish onto your pinky, index & thumb nails. While drying paint two coats of the white polish onto your ring & middle finger. Once completely dry, I placed down two vinyls next to each other to get a larger stipe then only one vinyl for the smaller stripes. Paint over them with your blue polish and peel off vinyls right away! 

Using BornPrettyStore Gold Circle Studs I placed 3 on the outer side of my pinky nails, 2 on the outer of my middle, & 3 again on the inner side of index nail. Now your stripes should be completely dry so go ahead and apply your top coat! I used HK Girl Fast Drying Top Coat !! 

Hope you all enjoyed! 


Happy Polishing !! 


Wednesday, May 6, 2015

Essie Sleek Stick Review

Haaay beaaautifullls! 

So I recently entered a contest held by @pawlished.kait on IG. I randomly saw the post on my feed two days before it ended so I figured why not give it a shot!? But boy oh boy I did not expect to win it!! It was one of those things ya do for the kick of it and I actually one! Plus she's lives super close to me so I got it within a week! Eeeeeek 😍😍 

Look at all these goodies !!!! 

First I decided to try out Essie's Sleek Stick - Stick On Nail Art Designs! I have never tried these before so it was super fun to finally try! 

I absolutely adoreee the floral print in the dark blue over the light blue !

But getting these on were sort of a challenge .. 


The package comes with 18 Strips, so you can choose the right size/ fit for each of your nails -- which was awesome! 

Getting them to lay completely flat onto your nail with out any lumps, was kind of the difficult part. - It was most hard with the bigger nail beds. - So then I used the cuticle pusher that it came with; to sort of smoothen out the bumps & lumps. 

The ' How To ' booklet says to take off the excess sleek stick from your nail - using the file given - file the sleek sticks on a downwards slant. This for me however did not work. I found it worked best jut to trim it down & then file to completely smoothen it to your nail! 

It does not say wether to use a top coat or not, but if you want them to last longer I'd suggest to do so. 

I hope you all enjoyed && don't get discouraged by my review ! Something's that's don't work for me might work perfect for you!

Thanks for reading !

Happy Polishig !

Tuesday, May 5, 2015

Zebra Print Nail Art

Hi lovelies! How are you all today!? 
I've got an easy nail art design for you all today using BornPrettyStore Stamping Plate QA 

In order to do this mani you will need two polishes of your choice. Once you've chosen any 2 pick your base colour and then you can apply two coats of ( I used )
China Glaze ; 

Once your base polish is completely dry, using your second choice of polish I used
Essie ; Licorice 

& then with BornPrettyStore's stamping plate QA I stamped on the Zebra Print Design to all of my nails! 

Wait for it to dry completely before applying your top coat to avoid any smudging !! I used HK Girl Top Coat!


Happy Polishing !

Saturday, May 2, 2015

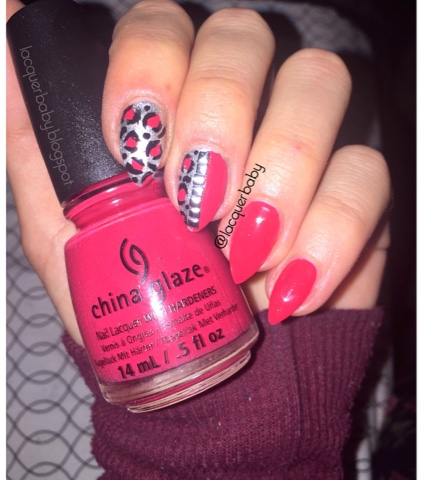
Red Leopard Print Studded Nail Art

Haaay beaaauts !! Hasn't this weather just been lovely lately !? Ugh! I'm absolutely loveeeeeing itttt 💕💕💕 

Anyways! Today's nail art design was inspired by the lovely @Audra_Dirce on Instagraam !! She has some amazing nail art designs to get inspired by .. You should go check her out!! 

First, but not last! I applied two coats of
China Glaze - Seas the Day onto my pinky, ring, & thumb nails. On my middle and index nails I applied two coats of
Sally Hansen - Celeb City.
Once dry I took 'Seas the Day' and applied a coat on half of my middle nail. 

Using BornPrettyStore Silver Square Studs & Nail Art Glue I placed then down the middle of my middle nail .. (It also helps cover the messy line!)

On my index nail and the silver half of the middle, I dotted on spots of 'Seas the Day' and leopard printed it with some
Essie - Licorice !! 

Awesome isn't it!?
Thanks Audra <3


Happy Polishing !!

Friday, May 1, 2015

Spring French Mani

Hi lovelies! 

Back today with a very simple but LOVELY Spring Manicure !

This is your regular French Tip Nail Art Design just not using your regular white tip!! Instead I decided to make it a bit more springy !! 

First I applied two coats of 
Sally Hansen - Peach of Cake to my nails 
Then I placed down my 
BornPrettyStore NailGuides & painted 
Sally Hansen - Wedding Glitters as my French Tip Colour .. But that's not it!

I finished it off with O.P.I Matte Top Coat to get a different look to it!


I hope you all enjoyed &&&& 

Happy Polishing !!!